In recent years I’ve seen many designers prototype in code, but very few of them used any kind of version control. This is dangerous as the wrong change to your page structure or CSS may break something that was working, and make you lose a lot of time trying to figure out what happened. Even worse, you may think that writing code is too hard and fall back to a comfortable tool like Axure or Photoshop.
If that sounds familiar, I’ve got good news for you. Git is a very simple tool to use once you understand a few basic concepts. It also enables collaboration between teams.
Why git
There are many version control systems but Git is the most commonly used nowadays. Created for developers, you won’t use it for storing Axure, Sketch or Photoshop files. But if you prototype in the browser, either coding yourself or with the help of a front-end developer, Git will save snapshots of your code. So“Every Git working directory is a full-fledged repository with complete history and full version-tracking capabilities, independent of network access or a central server.” Git Software, WikipediaA warning to Axure users: if you’re familiar with Subversion (SVN), the version control system used by Axure’s Shared Projects, you may assume Git is similar and apply the same mental model. Don’t do this, as it will only confuse you.
Most people use GitHub to host their git repositories (also known as repos), as it’s free for open source projects and a joy to use. Bitbucket or Gitlab are great alternatives to host your git repos if you need free private ones. There are many good graphical clients for Mac and Windows so you don’t have to use the command line. I’m not going to focus on any particular platform as the same concepts apply.
1. Create your repository
Start creating a repo on your preferred git host. Give it a sensible name so you and other viewers know what it is about. Congratulations, you now have an empty shell to store your files!Next click clone to get the repo locally. This will ask you for a local directory on your machine. Please note, this must be empty. So I recommend a new folder.
If you have already started working on your files, copy them to the newly created folder once your git client has finished cloning the repo.

2. Differences between commit and push
It’s important to note that on git you’re versioning your files both locally and remotely (e.g. GitHub). You commit your changes but that only saves them on your machine. You’ll have to push the commits to ensure all changes are saved on the server (and thus available to other people).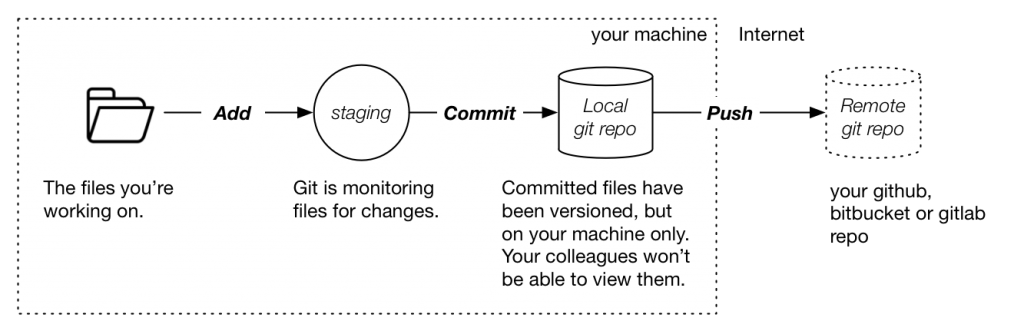 Always add a descriptive message to your commits. If you have to go back in time and check what happened two weeks ago, you want to understand what changed on each commit.
In case you ask, there’s no concept of checking out or locking the files, like in SVN. You don’t have to worry about a colleague locking a file, as Git has other ways to manage collaboration.
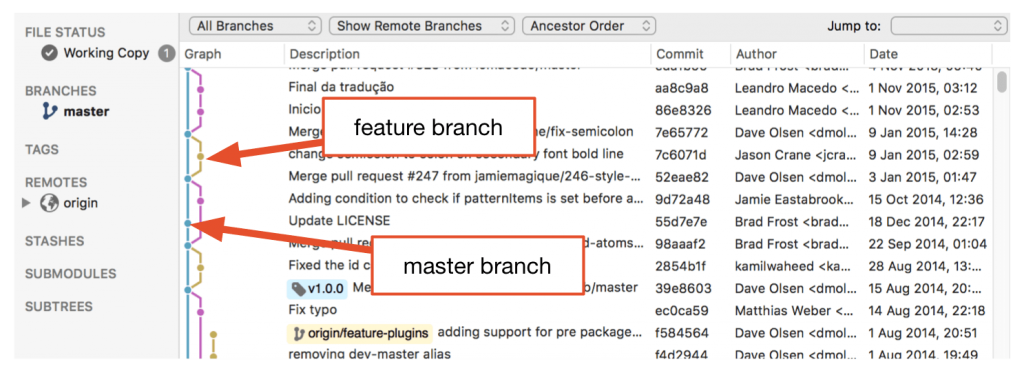
3. Understanding the tree and branches
If you can’t lock files, how do you ensure you’re not working on the same things? Enter branches. Git uses a tree metaphor to organise files:- Master branch. This is where your stable, production code is. You shouldn’t work here.
- Feature branches. Used to create new content (e.g. a new product page). This will duplicate the contents of the master branch and create a parallel universe. This allows you to work on new features keeping your master, stable code safe.
 Pattern Lab's commit history, via SourceTree[/caption]
4. Merging your branches with pull requests
Once you’re happy with your changes in the feature branch, it’s time to merge into master. To do so go to the website’s branch page (e.g. GitHub.com/repo-name/branch-name) and click pull request. This will trigger a workflow where your colleagues have the chance to review your work, add comments and approve it.Once the pull request is approved, somebody will hit merge (ideally you as you know the code). At this point Git will check for differences on the files, flagging any conflict where it is not possible to automatically merge them. You’ll have to manually go and solve those conflicts, commit the changes and merge.
You can also close the branch once the merge is done, if you’re not planning to work on it anymore.
These basic concepts should get you started with Git. If you want to learn more I’ll recommend you to dwell into GitHub’s help pages as they are an excellent source of knowledge.